Typing Lessons
How to type
Before you start learning the lessons, read the article Proper Typing Basics or How to type correctly.
Basic principles of blind and fast typing.
If you already have some typing skills, you can try to compete with other participants in online speed typing. Just join the games or create your own and improve your skills!
Lesson 1. Basic. Left hand.
This is the first lesson that will help you to get used to keyboard.
In the first few lessons we'll learn the middle row of the keyboard (ASDF...). You need to place your fingers on the keyboard so that your fingers slightly touch the keys but not press them. Your forefingers should be placed on the keys F and J (for your left and right hand accordingly). There are bumps on the keys on many types of keyboards, so you can find them without looking.
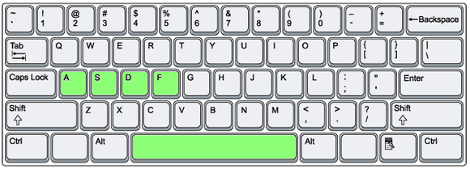
In this lesson you will type just with your left hand. Place your fingers on the keyboard according to the scheme:
- A - pinky
- S - ring
- D - middle
- F - forefinger
We'll also use the spacebar in this lesson. But you should press it with your right thumb. Remember that you should always press the spacebar using your other hand of previous typed symbol. In other words, you need to divide the keyboard into 2 parts; if you press the spacebar after a symbol in the right part, use your left thumb and vice versa. For example, the spacebar should be pressed with the left thumb after the letter J and with the right one after the letter R. Many people press the spacebar using the finger only of one hand, but if you really want to succeed in speed typing, you need to use your both hands.
So it’s enough for theory, let’s get practicing!
After you click “Start lesson” you will have to type sequences of letters ASDF and the spacebar. Do not worry about the speed, try not to make mistakes and not to look at the keyboard.
Lesson 2. Basic. Right hand.
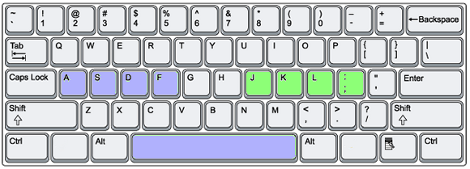
The second lesson is very similar to the first one. You we'll learn 4 more buttons:
- J - forefinger
- K - middle
- L - ring
- ; - pinky
Though there is a difference from the previous lesson: you will type using your both right and left hands. Typing skill will come to you gradually, with experience, and practicing is essential to improve hands coordination.
Remember that typing without mistakes is more important than speed now. It is also important not to look at the keyboard as you type.
Lesson 3. Basic. Index fingers.
Congratulations! You have successfully learned the position of the hands on the keyboard and you can press the keys of the middle keyboard line without looking at it.
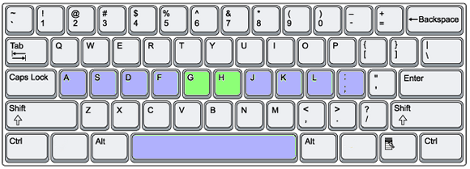
In the previous lessons each of your fingers was responsible for only one key. In fact, each finger can be responsible for several keys. In this lesson you will learn 2 more keys — G and H, which you also should press using your forefingers.
- G - left hand forefinger
- H - right hand forefinger
Let's go!
Lesson 4. Shift keys.
This is one of the most important lessons in the whole series. You will learn how to press the Shift keys properly. The main problem with these keys is that it's very easy to lose control of fingers over the keyboard. And if it happens, it’s very difficult to continue typing correctly.
It's very important to remember one thing: the Shift key is always pressed by the pinky finger opposite to the one hitting the other key and this is the same with the Space button!
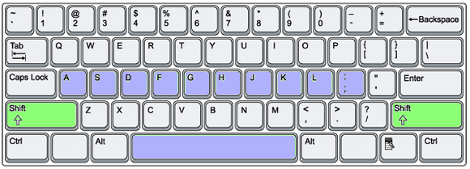
When you press the Shift key try not to move your hands from the basic position (ASDF and JKL;). No matter how hard it is and how you want to do it try not to move your fingers from the starting position. Hands also should not be turned widely. You should stretch your pinky fingers.
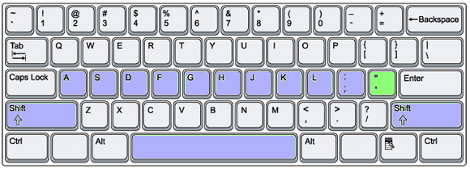
Lesson 5. Quotes and apostrophes.
It's time to learn how to type quotation marks and the apostrophe. They are located on the same key, which should be pressed with a right hand pinky. A quotation mark also requires the left Shift key to be pressed.
These symbols can be often found in such words as "Couldn't", "I'm", "Jim's", etc. Quotation marks are used less, mostly in quotations and figurative speech.
This is the last lesson for learning the middle keyboard row. In the next lessons we'll learn the QWERTY keyboard row.
Lesson 6. Left hand. "QWERT" keys.
It's time to learn more difficult things. In this lesson you will need to stretch your fingers as with the Shift keys, because now every left hand finger will be pressing several extra keys:
- Q - pinky
- W - ring
- E - middle
- R and T - forefinger
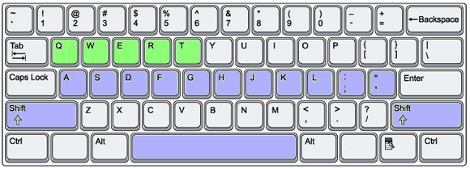
The main rule is not to remove your fingers from the basic keys while typing symbols of the top row. Your fingers should always touch the basic keys (ASDF). Try to reach the necessary keys without changing your hands position on the keyboard, by move only your fingers. This way your fingers will not lose the proper orientation on the keyboard.
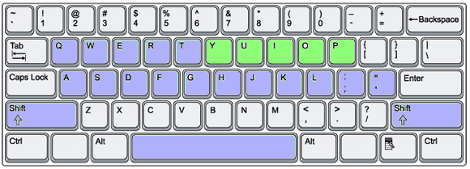
Lesson 7. Right hand "YUIOP" keys.
This lesson is very similar to the previous one, just the new keys are YUIOP:
- Y and U - forefinger
- I - middle
- O - ring
- P - pinky
Lesson 8. Left hand. "ZXCVB" keys.
You have already learned almost all the keys on the keyboard. Now we’ll learn keys of the bottom row. In this lesson it will be:
- Z - pinky
- X - ring
- C - middle
- V and B - forefinger
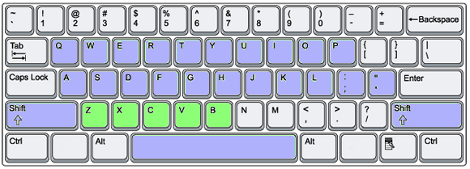
Place your fingers in the the basic position and try to reach the necessary key. It's difficult, isn't it? This lesson is probably one of the most difficult in the whole course, so be patient and practicing.
There is another way to handle these letters: Z - ring, X - middle, C, V and B - forefinger. As you see, in this case pinky finger does not take part at all. This method is preferable for some people, try it out, it may be easier for you.
The bottom row is one of the most difficult in typing: fingers always tend to change each other, and the hand often moves from the basic keys to press a key from the bottom row. You should practice this lesson until your left hand will stay still.
Also try to teach your left hand forefinger to press the key "B" because very often one wants to press it with a right hand forefinger (which should not be done).
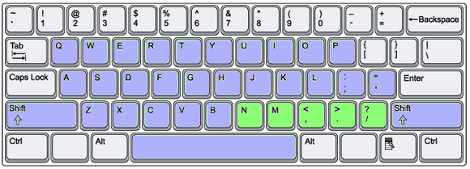
Lesson 9. Right hand. "NM,.?" keys.
This lesson is easier than the previous one. You'll learn N and M, punctuation marks such as dot and comma, as well as slash and question mark. These keys are usually pressed with the right hand:
- N, M - forefinger
- , - middle
- . - ring
- ? and / - pinky
-
You can get question mark "?" using the left Shift key.
Don't forget that you are still studying, speed is not the main goal now. The main thing is to type correctly without mistakes and control your fingers and hands position.
Lesson 10. Brackets.
Brackets. They are very rare guests in texts. More probably you can meet them in some software code. Click right over this text with the right mouse button and choose the menu item "Review the source code" (or something similar). You will see HTML code that consists of tags like >span<text>/span<. Even if you are not an IT-specialist, you should learn to type this sort of things for your future progress. So you can get them this way:
- < - middle (with left shift)
- > - ring (with left shift)
- [ and ] - pinky
- { and } - pinky (with left shift)
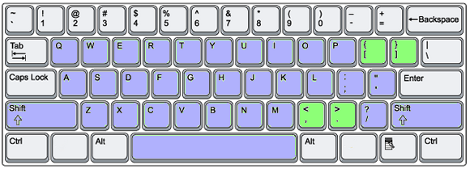
As you can see most of the brackets need pressing the left Shift key.
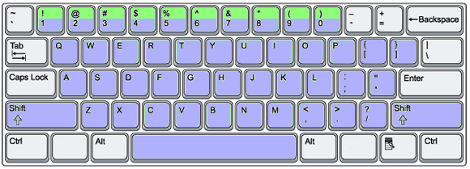
Lesson 11. Numbers.
Congratulations! Now we have the next to our last lesson. You are a few steps away from becoming a typing master!
In this lesson we'll learn how to type numbers. There is nothing difficult about them, it’s just that your fingers will have to jump over 1 row. In this exercise you have to control fingers and hands position as never before because it's very easy to lose control of basic keys here:
- 1 - pinky (Left hand)
- 2 - ring (Left hand)
- 3 - middle (Left hand)
- 4, 5 - forefinger (Left hand)
- 6, 7 - forefinger (Right hand)
- 8 - middle (Right hand)
- 9 - ring (Right hand)
- 0 - pinky (Right hand)
Remember: don't lose your fingers and hands position on the keyboard!
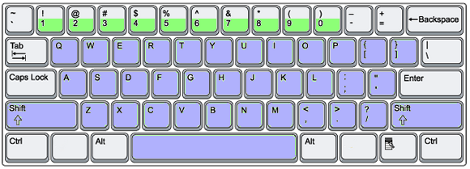
Lesson 12. Top row symbols: "!@#$%^&*()".
So this is the last lesson! We are going to be dealing with the numbers row again, only this time the Shift keys are going to be involved as well.
When you type symbols on the left part of the keyboard use the right Shift key, and vice versa.
Good luck in the last lesson! After you finish it you can go to Games, create your own games or join to other participants and improve your skills!
You' ll become the TOP ONE!
 Privacy policy © 2011-2020 All rights reserved